
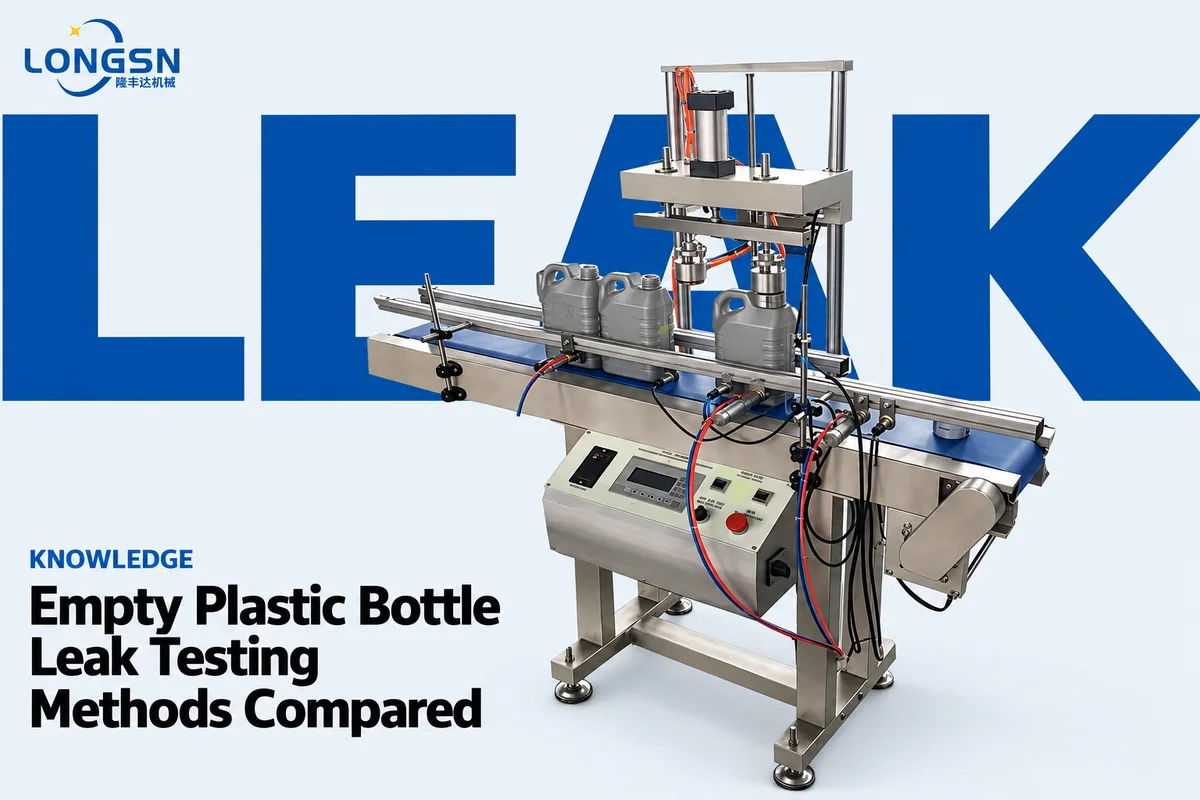
Empty plastic bottle leak testing looks like one job, but plants run it in four different ways, and the right one depends on output, bottle size and how small a leak has to be. A jerry can plant checking 1,200 bottles an hour has a different problem from a laboratory checking a few sealed vials. This article compares the four common methods in plain terms, says where each one fits, and shows how the LONGSN LSN-LT series approaches the job.
Why empty plastic bottle leak testing comes before filling
A bottle that leaks is cheapest to find before it is filled. A leaking bottle on a filling line loses product, wets the conveyor and can stop the line while someone cleans up. A bottle that leaks after it has been capped, boxed and shipped becomes a complaint. Empty plastic bottle leak testing, done straight after blow moulding or after neck cutting, puts the check where the cost of a failure is lowest. The bottle is tested empty, and nobody has paid for product, caps or cartons yet.
Leaks in blow moulded bottles usually come from a few places. A pinhole can form in the wall where the parison was thin. The pinch-off weld at the base of an extrusion blow moulded bottle can be weak. The neck finish can be damaged by trimming or by a worn cutter. Each of these is a small opening, and the test has to find it without damaging the bottle or slowing the line.
The test also has to match the bottle. A 1 litre oil bottle, a 5 gallon water bottle and a 200 litre drum differ in volume by a factor of hundreds, and volume matters more to a leak test than almost anything else, as the next sections explain.
What a leak test does
A leak test checks whether a sealed container holds air, or lets air through. The tester closes the container, changes the pressure inside it or around it, and watches for any change that should not happen. A sound container keeps the pressure it was given. A container with a hole, a weak weld or a damaged seal does not. Every method below is a different way of giving the container a pressure and reading what it does.
Leak testing is used far beyond plastic bottles, in car parts, medical devices and pipework. Those fields often look for much smaller leaks than a jerry can plant cares about, and some use tracer gases such as helium. This article stays with empty plastic bottles and the four methods that suit them.
The four methods at a glance
All four methods start the same way. The mouth of the bottle is sealed, so the bottle becomes a closed container. They differ in what they do next and what they measure. The table sets them side by side for an empty plastic bottle.
| Method | What it does | What it measures | Strength | Weak point |
|---|---|---|---|---|
| Pressure decay | Fills the bottle with air, then isolates it | Pressure drop over a set time | Dry, fast, easy to automate | Large bottles need time to settle |
| Vacuum decay | Pulls air out of the bottle or a chamber | Pressure rise over a set time | Good for sealed packs | Thin walls can pull inward |
| Bubble test | Pressurizes the bottle and puts it under water | Bubbles at the leak point | Shows exactly where the leak is | Wet, slow, depends on the operator |
| Mass flow or differential | Compares the bottle with a sealed reference | Air flow or pressure difference | Very sensitive | Higher cost, more tuning |
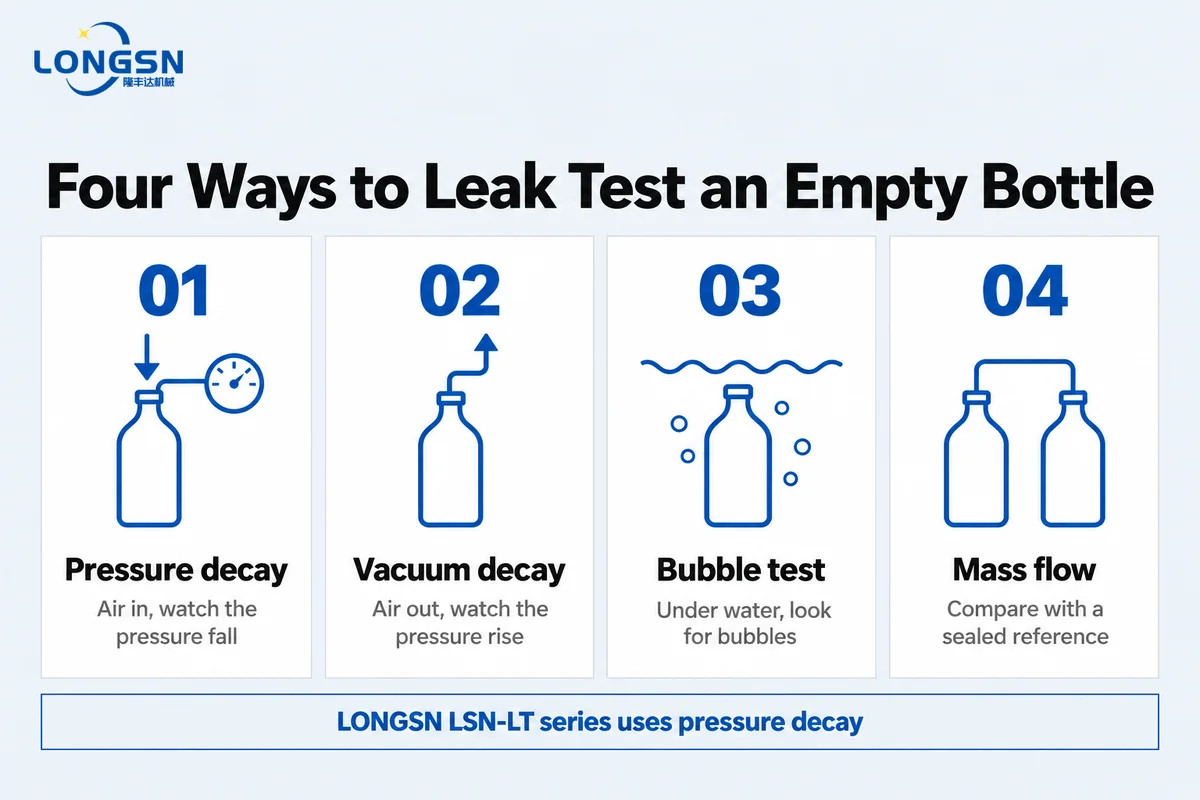
None of these is better in every case of empty plastic bottle leak testing. The questions that decide between them are how many bottles an hour the line runs, how large the bottles are, whether wet bottles are acceptable, and how small a leak counts as a failure.
Pressure decay leak test
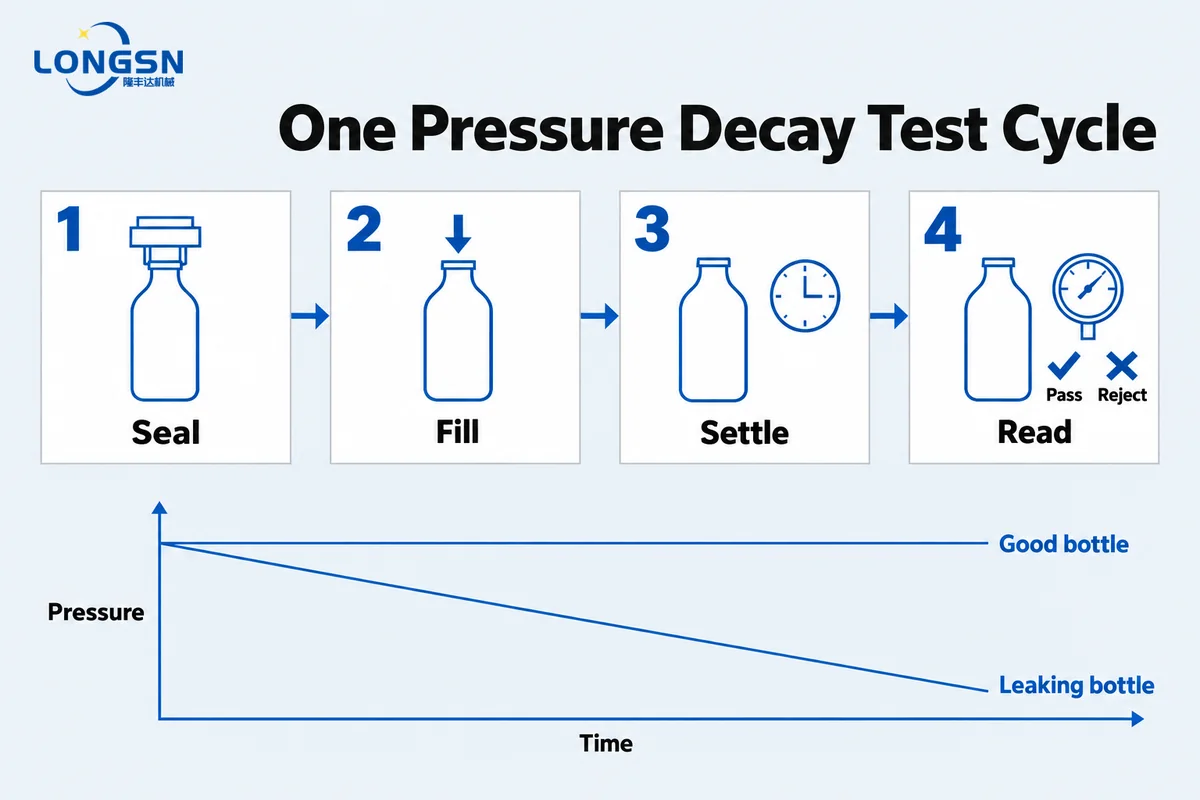
A pressure decay leak test is the method most plastic bottle plants use for empty containers. It is a form of air leak testing, because the only thing the machine handles is compressed air. The tester seals the mouth, charges the bottle with air to a set pressure, closes the supply and watches a pressure sensor. If the pressure holds, the bottle passes. If it falls by more than the set limit in the set time, air is escaping and the bottle is rejected.
The method suits bottle lines for three reasons. It is dry, so the bottle leaves the tester in the same state it arrived. It needs no consumables except compressed air. And the whole cycle can be run by a PLC and a pressure sensor, so a station can load, seal, test and reject on its own.
What decides the result
Volume is the first factor. For the same leak size, a small bottle loses pressure quickly because there is little air inside, and a large bottle loses it slowly. A 20 litre jerry can with a pinhole drops in pressure far more slowly than a 500 ml bottle with the same pinhole. Large containers therefore need a longer test time or a more sensitive sensor.
Temperature is the second. When air is pushed into a bottle it warms slightly, and as it cools the pressure falls even when nothing leaks. A good test includes a short settling step before the reading starts, so the cooling is finished before the machine decides. Skipping this step is a common reason for a pressure decay tester to reject good bottles.
The seal on the neck is the third. If the sealing head does not close properly on the bottle finish, the machine reads a leak that belongs to the head, not the bottle. Neck finish quality, and how well the bottle is located under the head, matter as much as the sensor.
Wall flexibility is the fourth. A thin HDPE bottle swells slightly under pressure. The swelling lowers the pressure at first and can keep creeping for a short time, which looks like a small leak. Setting the test pressure low enough to limit swelling, and the settling time long enough to let it level off, keeps the reading stable.
Where it falls short
Pressure decay tells you that a bottle leaks, not where. It also has a limit on how small a leak it can see, set by bottle volume, test time and sensor resolution. For most bottle plants this limit is fine, because the aim is to reject bottles that will visibly leak. For a pharmaceutical vial that has to prove a seal against microbes, it is not enough, and other methods are used.
Vacuum decay leak test
A vacuum decay leak test reverses the direction. The tester pulls air out of the bottle, or out of a chamber around it, then closes the vacuum line and watches the pressure. If air leaks in, the pressure rises. Because it measures air coming in, it can test a bottle or pack that is already closed.
A vacuum decay tester has a vacuum pump, a sealed chamber or head, a pressure sensor and a controller that closes the line and watches the reading. That is why vacuum decay is common in the testing of sealed, filled packages, such as food trays and pharmaceutical containers. The package is placed in a chamber, and the method can find leaks without opening it.
For empty plastic bottles it is used less. The first reason is the wall. A thin walled HDPE or PET bottle can be pulled inward by the vacuum, which changes its volume during the test and makes the reading drift. The second reason is speed. Pulling a good vacuum takes time, and a line running at thousands of bottles an hour has little to spare. The third reason is that an open empty bottle can be tested with positive air pressure just as well, with less strain on the wall.
There are cases where it makes sense. A bottle with a thick wall, a tight leak limit and a modest output can be tested in a chamber by vacuum decay. If that describes your product, discuss it with the supplier before choosing.
Bubble leak test
The bubble leak test is the oldest method and still in use. The bottle is sealed, pressurized with air and put under water. A stream of small bubbles shows where air escapes. It needs very little equipment, and the operator sees the leak with their own eyes.
Its main strength is location. A pressure decay machine says that a bottle failed. A bubble test says that the weld at the base is the problem, or that the neck finish is cracked. For that reason some plants keep a small water tank in the quality room, even when their line uses automatic testers. A bottle that fails on the machine can be dipped to find the cause, and the finding goes back to the blow moulding team.
It is a poor choice for the production line itself. The bottles come out wet and must be dried before capping or bagging. The result depends on the operator, how long they watch and how good the light is. Water has to be kept clean, and the rate is limited by how many bottles can be handled by hand. A bubble test can be automated with a tank, a conveyor and a camera, but that is a more complicated machine than a dry pressure tester, and it still leaves a drying step.
Mass flow and differential pressure tests
Mass flow and differential pressure testers use a reference. The tester fills the bottle and a sealed reference volume of the same size with air, then compares them. If the bottle loses air, the difference between the two shows up. Because the reference and the bottle see the same temperature change, these methods cancel out some of the problems of a simple pressure decay test.
The gain is sensitivity. Differential testing can see smaller leaks, or see them faster, than a basic pressure drop reading. It is used where the leak limit is tight, such as in automotive parts, medical devices and some chemical containers.
The cost is complexity. The tester needs a precise reference, a more sensitive sensor and more careful setup for each product. For a plant testing jerry cans or oil bottles to a visible leak standard, the extra sensitivity usually does not pay back. For a plant with a strict specification from a customer, it may be required. Check the specification before buying a more sensitive machine than the job needs.
Standards and who sets the limit
There is no single standard that says how small a leak a plastic bottle may have. Standards bodies do cover leak testing in general. ISO has a technical committee, ISO/TC 135, with a subcommittee on leak testing, and there are standards for calibrating reference leaks and for testing sealed radioactive sources. Those belong to other industries and have little to say about a jerry can. For plastic bottles the limit is usually set by the customer's specification and by what the product does when it leaks. Ask your customer whether a limit is written down, and give it to the supplier of the tester.
How to match the method to your line
Five questions settle most cases of empty plastic bottle leak testing. Answer them for the bottle you actually make, and use them when you compare any bottle leak tester.
- What is the output? Below a few hundred an hour, a manual or semi-automatic station is enough. Above that, an automatic in-line tester is needed, with more stations as the output rises.
- What is the bottle volume? Small bottles are easy and fast. Bottles above 5 litres need longer test times, so more stations are needed to reach the same output.
- Is a wet bottle acceptable? If not, bubble testing is out for the line, and dry air methods remain.
- What is the smallest leak that counts as a failure? A visible oil leak and a microbial seal are very different limits.
- Does the machine have to reject bottles on its own? Automatic rejection needs a PLC, a pusher or a diverter, and a sensor that gives a clear pass or fail.
For most plastic bottle lines the answers are a few hundred to a few thousand bottles an hour, a dry bottle, a visible leak limit and automatic rejection. That points to pressure decay. For a laboratory or a sampling check, a bubble test is a good addition. For a customer with a very strict limit, a differential tester may be worth the cost. The methods are not rivals so much as tools for different jobs.
The station count also sets the output. If one station completes a test in 6 seconds including loading and rejection, it handles about 600 bottles an hour. Four stations running in turn handle about four times that. This is an example of the arithmetic, not a LONGSN specification, but it shows why a larger bottle with a longer test time needs more stations to keep up with the line.
What the LONGSN LSN-LT series does
The LSN-LT series of empty bottle leak testers uses pressure decay. The tester seals the mouth of the empty container, fills it with air and reads the pressure decay. A bottle that cannot hold pressure is rejected automatically before it reaches filling. The other three methods are described here so that you can judge what suits your product.
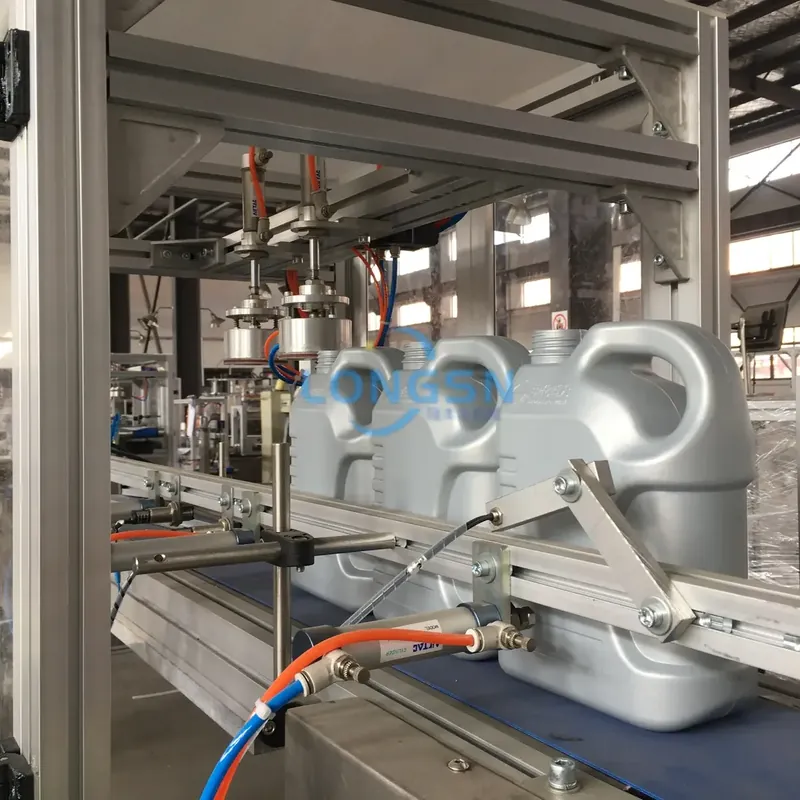
The series is built with a PLC and high-precision pressure sensors. Detection settings are stored per product on the PLC and recalled from the touch screen, so one machine can test several bottle types. The series has 1, 2, 4 or 8 test stations and covers 600 to 4,000 bottles per hour, depending on the model and the bottle. Container sizes run from 1 ml up to 330 L, with different models for different parts of that range.
| Model | Output | Container range | Where it fits |
|---|---|---|---|
| LSN-LT1 | 600 to 1,000 per hour | 1 ml to 50 L | Multi-head linear tester for general bottle lines |
| LSN-LT2 | 800 to 1,200 per hour | 1 ml to 50 L | PE, PP and PET bottles, listed for 1 to 5 L |
| LSN-LT4 | 2 to 10 seconds per test | 200 ml to 10 L | Bottles 20 to 250 mm wide, tested one at a time |
| 3 to 5 gallon tester | 150 to 800 per hour, 1 to 4 stations | 10 ml to 330 L | Water bottles and large containers |
| One-station tester | 1,200 to 3,200 per hour, by bottle size | Up to 160 mm wide, up to 8 L | Small and medium bottles at high output |
These figures come from the product pages and the leak tester category page. Output depends on the bottle, so a sample test settles the final number. Most of the pages list a 2 year warranty and CE certification.
Because empty plastic bottle leak testing sits behind blow moulding and neck cutting, it is often part of a longer finishing line. The article on connecting bagging with leak testing and conveyors shows how the stations are arranged in a typical layout. If your bottles also need trimming, the same line can include a bottle neck cutting machine ahead of the tester.
Common mistakes when choosing a method
The first mistake in empty plastic bottle leak testing is buying more sensitivity than the product needs. A sensitive differential tester on a line making oil bottles adds cost and setup work without changing what customers see. Define the failure first, then pick the method.
The second is ignoring bottle volume. A tester that works well on 1 litre bottles can be too slow on 20 litre jerry cans, because the larger volume needs a longer test. If your range is wide, ask for the test time at both ends of it.
The third is skipping the settling step. Rejecting good bottles costs as much as passing bad ones, and it is a frequent complaint about new testers. A short settling time, set during commissioning with real bottles, fixes it.
The fourth is testing only a few bottles during acceptance. A leak tester should be proven with bottles that have known leaks, such as a bottle with a drilled hole of a set size. If the machine does not reject the reference leak every time, the setting is wrong. Ask the supplier to run your own bottles, with and without a deliberate leak, before the machine ships.
What to send for a recommendation
To plan empty plastic bottle leak testing for a new line, a sample bottle or a drawing is the best starting point. Along with it, send the material and wall thickness, the bottle volume, the neck finish, the output you need per hour and the smallest leak you want to reject. Say whether the bottle is tested before or after trimming, and whether the tester will stand alone or sit in a line with other machines.
With that information, LONGSN engineers can name a model, the number of stations and the expected output, and send you a quotation. Use the form on the contact page, or open the leak tester category to see all eight models with their photos and specifications.
Frequently asked questions
Which method is best for empty plastic bottle leak testing?
For bottles tested in-line at hundreds or thousands per hour, pressure decay is the usual choice. It is dry, automatic and quick to set up. Vacuum decay, bubble and mass flow tests suit sealed packs, laboratory work or very tight limits.
Can a bubble leak test be automated on a bottle line?
It can be done with a water tank and a handling system, but the bottles come out wet and must be dried before capping or bagging. Many plastic bottle plants test dry with air pressure instead, because it keeps the line simple and clean.
How long does a pressure decay test take on one bottle?
It depends on the bottle volume and the pressure used. Small bottles take a few seconds, while large jerry cans and drums need longer to settle. The LSN-LT4 page lists 2 to 10 seconds per test.
Does vacuum decay work on empty HDPE bottles?
It can, but thin walls may pull inward under vacuum, which changes the volume and the reading. Vacuum decay is more common on sealed, filled packages. For open empty bottles, plants usually prefer positive air pressure.
What bottle sizes can a LONGSN leak tester handle?
The LSN-LT series covers containers from 1 ml up to 330 L depending on the model, with 1, 2, 4 or 8 stations and 600 to 4,000 bottles per hour. Send a sample and your target output for a model recommendation.
What should I send to get a leak tester quotation?
Send a bottle sample or drawing, the material and wall thickness, the bottle volume, the output you need per hour and the smallest leak you want to reject. LONGSN engineers reply with a model, the station count and a quotation.