

Deflashing plastic bottles is a small step that decides how well the next three steps go. A rough rim will not seal under a cap, a sharp burr cuts hands, and plastic dust ends up in a bottle that is about to be filled. This article explains where flash comes from, compares the main ways of removing it, and shows where the LONGSN neck cutting machines fit.
Where flash comes from on a blow moulded bottle
Most jerry cans, oil bottles and chemical containers are made by extrusion blow moulding. A hot tube of plastic, called the parison, hangs between two open mould halves. The mould closes around it, air is blown in, and the plastic is pushed against the cavity wall. The mould halves pinch the parison as they close, and the plastic outside the cavity is squeezed out as flash.
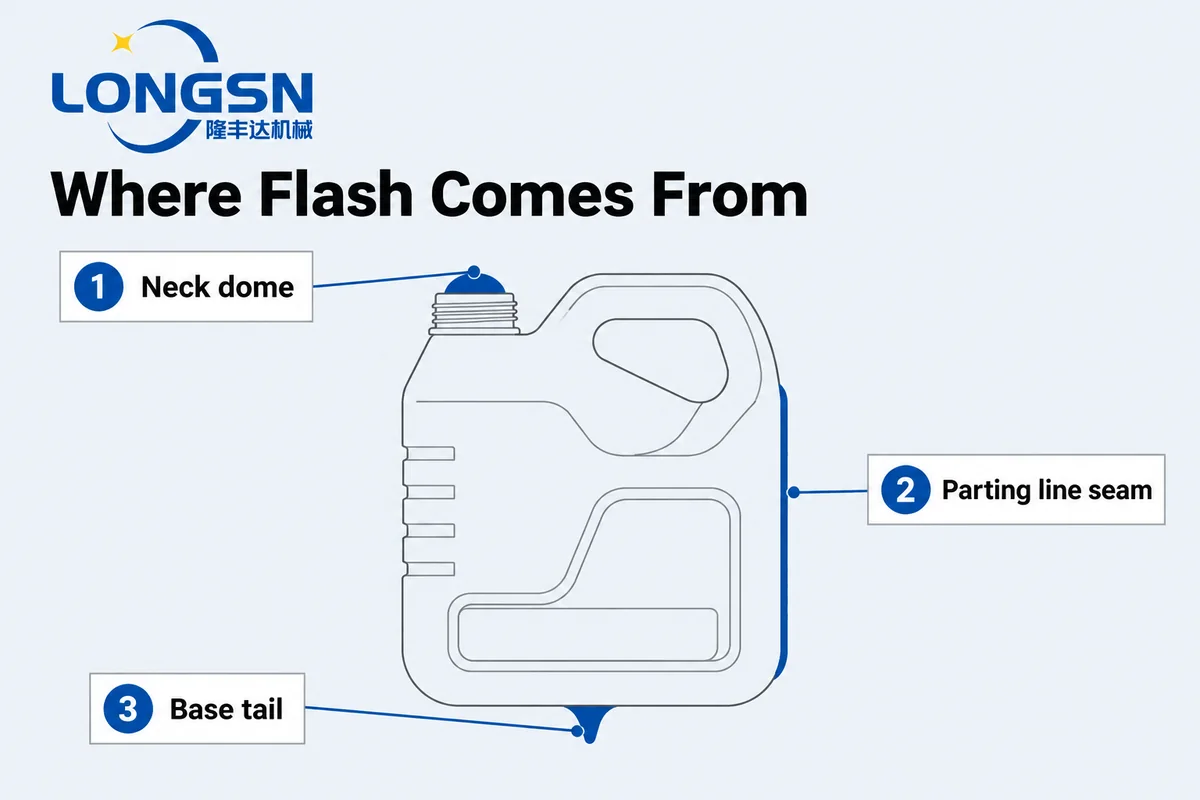
That flash appears in three places. The first is above the neck. The container cannot be blown with its mouth open, and a closed dome of process material stands where the opening will be. The second is under the base, where the parison is pinched shut and leaves a tail. The third is a thin seam along the parting line where the two mould halves meet, and on handled containers there can also be a web of plastic inside the handle.
The neck dome is the part that matters most for the closure, because the cut it leaves becomes the sealing face. The base tail matters for stability and for how the bottle sits on a pallet. The parting line seam is usually only a cosmetic issue, though it can catch on label applicators.
Why the flash has to come off before the next step
Deflashing plastic bottles starts at the neck, because a bottle cannot be capped with a dome on top. The quality of that cut sets what happens next. A flat, square rim lets a cap liner or an induction seal lie flush. A rim with a burr props the liner off the surface, and product seeps past the high point. An angled cut loads the cap unevenly and the seal is tight on one side and loose on the other.
A torn or serrated edge is worse, because it sheds fine plastic dust into the empty bottle. No cap can fix that, and it can end up in the product. Sharp flash is also a safety issue for the people handling bottles, and loose flash on a conveyor can jam the machines behind it.
Flash that is cut off cleanly is not wasted. It can be ground and fed back to the extruder, as long as the plastic is clean and the grade matches. Cutting it off in one piece makes that easier than picking it out of a pile of shavings.
Six ways of deflashing plastic bottles
The methods below run from a hand knife at a workbench to a robot cell. They differ in cost, output and the finish they leave. The table compares them for bottles and jerry cans, and the sections after it explain each one.
| Method | Best for | Output | Weak point |
|---|---|---|---|
| Hand knife or hand-operated trimmer | Samples, trials, very small runs | Low and depends on the worker | Cuts vary, burrs and angled rims are common |
| Semi-automatic neck trimmer | Small plants, several bottle types | Medium | Loading by hand sets the pace |
| Automatic neck cutting machine | Bottles and jerry cans at line speed | High, set by cutting heads | Holder and cutter set to one bottle at a time |
| Trimmer built into the blow moulder | Dedicated high-volume bottle lines | Matches the blow moulder | Tied to that blow moulder and mould |
| Cryogenic tumbling | Small moulded parts with thin flash | Batch | Poor fit for thick neck domes and large bodies |
| Media or dry ice blasting | Thin flash on small parts | Batch or cell | Not a cutting method and does not make a sealing rim |
Hand knife and hand-operated trimmers
Deflashing plastic bottles by hand is where many plants start. A hand knife is the first tool, and a hand-operated trimmer, a fixture that holds the bottle while the worker turns a cutter, is the next step up. Both cost little and suit trial runs and samples. The trouble starts when the volume rises. Each cut depends on the worker's hand and attention, and rims come out at slightly different heights and angles. A tired operator leaves burrs, and a sharp tool in a worker's hand is a safety risk. A semi-automatic trimmer adds a motor and a fixed holder, but an operator still loads each bottle, so the pace stays tied to the person.
For a production line the hand method is usually a stop-gap. It is worth knowing as a baseline, because it shows what an automatic machine is replacing. A plant that finds many rejects at the leak tester or the capper can often trace the cause back to this step.
Automatic neck cutting machines
An automatic neck cutting machine locates each bottle by its neck ring, holds it, and cuts the dome off in one pass. Because the bottle is held in the same place every time, the cut is at the same height and angle every time. The machine can stand beside the blow moulder and take bottles off a conveyor, or run as a stand-alone unit. A bottle neck cutter of this kind is set up for one bottle at a time, and a second bottle type needs its own holder and cutting head, so a plant with many types should ask how long a change takes.
This is a common method for jerry cans and oil bottles, and it is what the LONGSN neck cutting range does. A later section covers the models.
Trimmers built into the blow moulder
Some blow moulding machines carry their own trimming station, either at the mould or just after it. This saves floor space and a conveyor transfer. The cost is flexibility, because the trimmer is tied to that machine and often to that mould. A plant that runs many bottle types, or that wants to add trimming to existing blow moulders, may prefer a separate machine.
Cryogenic deflashing
Cryogenic deflashing chills the parts until the thin flash becomes brittle, then tumbles them with media until the flash breaks off. It is used mainly for small moulded parts with thin, fragile flash. A jerry can has a thick neck dome and a large body, and the flash is heavy plastic, not a thin film. Tumbling a large container is hard to do, and it still would not leave a flat sealing rim. For bottles and cans the method is a poor fit.
Media and dry ice blasting
Blasting uses a stream of media or dry ice pellets to knock thin flash off small parts. It can target a specific area without cutting the part. Like cryogenic tumbling, it removes thin flash and does not cut away a dome or produce the clean rim a cap needs. It belongs to the finishing of precision parts, not to a bottle line.
Deflashing by robot
A robot with a cutter or a deburring tool can follow the shape of a part and trim it. It is useful for parts with complicated outlines, such as handled containers where the flash sits inside the handle web, and for parts that change often. The price and the programming effort can be high, and the cycle time is likely to be longer than a dedicated neck cutter. Where the shape is simple, as it is on the neck of a jerry can, a dedicated neck cutting machine is likely to do the same job faster and for less money.
What the LONGSN neck cutting machines do
LONGSN builds six bottle neck cutting machines, all aimed at the dome above the neck. The LSN-C2 page describes the machine as a holding device, a moving device and a deflashing device in one frame, and says the deflashing device moves in step with the holding device so that movement error is removed. The machine can deflash bottles on a blow moulding line, and its range is 1 ml to 30 L.
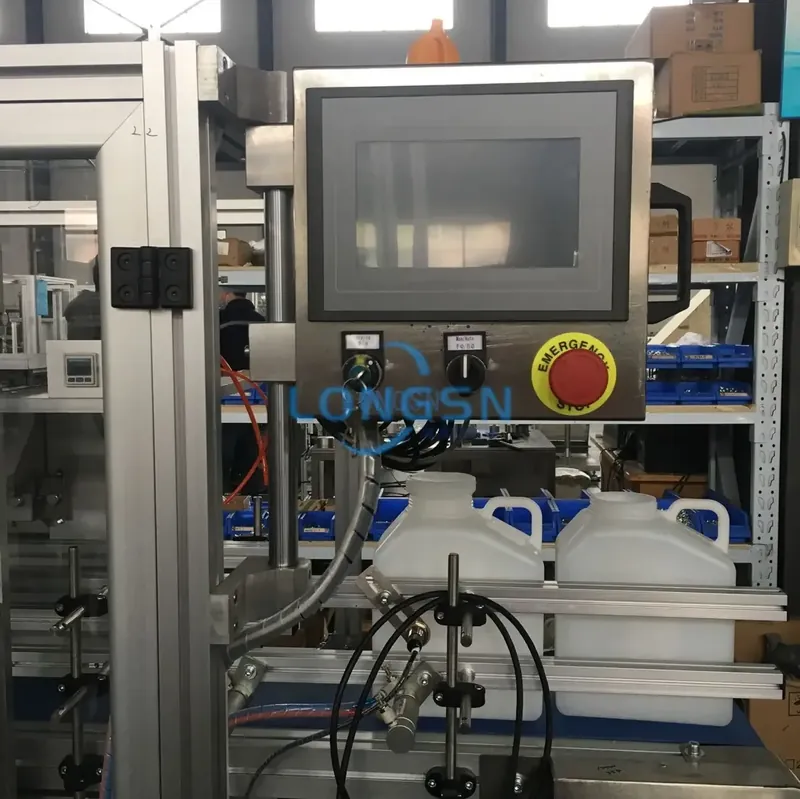
The LSN-C1 page describes a trimming machine that gives a finish after deflashing for empty containers from the blow moulder, and says it is widely used when containers will take induction sealing. The LSN-CTL1 is a servo rotary design for PE and HDPE bottles with soft cutting that leaves smooth edges without a thin film. Two models, the LSN-CL2 and the LSN-TL1, also include a leak tester in the same frame.
| Model | Output | Range | Notes |
|---|---|---|---|
| LSN-C2 | 10 to 30 per minute, or customized | 1 ml to 30 L | Holding, moving and deflashing devices in one frame |
| LSN-C1 | Up to 30 per minute, set by bottle and cutting heads | Diameter and height made to order | Finish for induction sealing, 260 W motor, 5 to 7 kgf/cm2 air |
| LSN-C4 | Up to 30 per minute | Diameter and height made to order | Jerry cans and containers |
| LSN-CTL1 | 20 to 30 per minute | PE and HDPE bottles | Servo rotary design, soft cutting for smooth edges |
| LSN-CL2 | 10 to 30 per minute | 1 ml to 30 L | Neck cutting and leak testing in one machine |
| LSN-TL1 | 1,000 to 1,400 per hour | 10 ml to 50 L, or customized | Rotary neck trimming and leak testing |
The figures come from the product pages and the category page. Output depends on the bottle and the number of cutting heads, so the final number is set with a sample. Most of the pages list a 2 year warranty and CE certification.
The machines on this site describe cutting at the neck. They do not describe trimming the tail at the base of the bottle, so if your container has base flash, raise it when you ask for a quotation.
What happens at the base of the bottle
The tail under the base comes from the pinch-off, the place where the mould squeezes the bottom of the parison shut. It is trimmed in one of three ways. Some blow moulders cut it at the machine. Some plants trim it by hand or with a simple fixture after the bottle comes out. Others run the bottle through a trimming station further down the line.
The pinch-off matters for more than appearance. The weld that closes the bottom of the bottle is one of the places a bottle can leak, and a weak or thin weld often shows up later at the leak tester. A stub of tail left too long can also make the bottle rock on a flat surface, which causes trouble on a conveyor and on a pallet.
Reducing flash at the source
Blow moulding flash is the first thing to look at when the cutter has trouble. Every gram of flash is plastic that was heated, extruded and then cut off. Reducing it saves material, lowers the grinding load and gives the cutter less to do. The causes are mostly on the blow moulder.
A worn or poorly set pinch-off on the mould lets too much plastic escape, and a mould that does not close squarely leaves a thicker seam. A parison that is longer or heavier than the bottle needs makes a bigger dome and a bigger tail. A melt that runs too hot can cause flash and torn trim lines. A change in flash weight can be the first sign of a mould or process problem.
None of this removes the need for deflashing plastic bottles. A closed dome above the neck is part of the process. It does mean that the cutting step is easier to keep stable when the blow moulder upstream is stable.
Problems after cutting and what they point to
The cut itself tells you what is wrong. Each of the common faults has a usual cause, and the cause is usually one of the holder, the blade or the speed.
| What you see | What it does at the cap | Usual cause to check |
|---|---|---|
| A thin burr on the rim | Props the liner off the face and lets product seep past | Dull blade or a cut that is too slow |
| A rim out of square with the neck ring | Loads the cap on one side | Bottle not seated in the holder, or holder worn |
| A torn or ragged edge | Sheds dust into the empty bottle | Blade condition, cutting speed or plastic temperature |
| Rim height varies from bottle to bottle | Cap depth and liner pressure change | Bottle height variation or loose stop |
| A thin film of plastic left on the edge | Can break off as loose fragments | Cutter type, since the servo rotary model is described as soft cutting without a thin film |
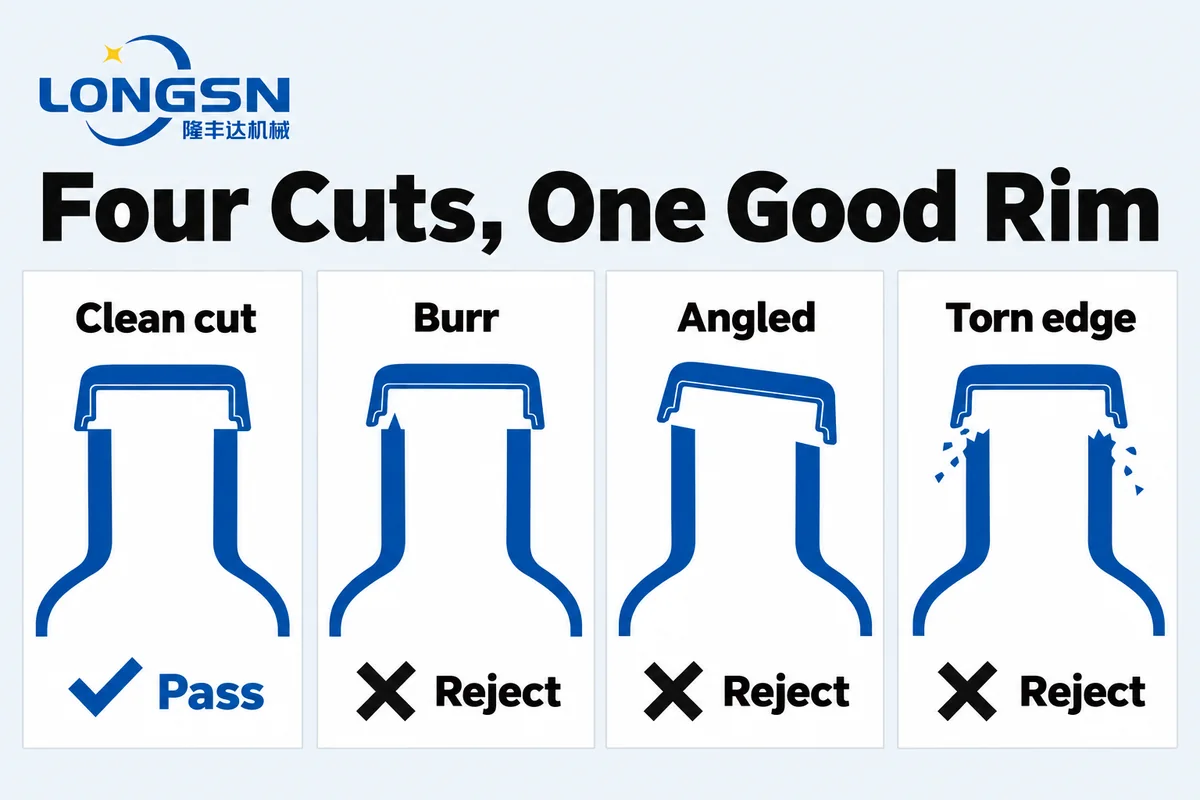
The point of the table is that a deflashing problem is rarely found by looking at the bottle alone. The holder, the blade, the speed and the bottle have to be checked together, and the holder is the best place to start, because it decides where the bottle sits.
Where deflashing sits on the line
On a bottle line, deflashing plastic bottles is done by a neck cutter that sits right behind the blow moulder, ahead of the leak tester and the bagging machine. The order matters. A leak tester needs a finished rim to seal against, so the bottle has to be cut before it is tested. The cap line, with its liner inserter, runs separately, but the capper that closes the bottle later needs the rim to be right.
Flash and trim should leave the machine by a chute or conveyor to a grinder or a bin, not fall on the floor. Plants that regrind flash keep it separate from other scrap and from other grades, so that it can go back to the extruder.
How to choose a method for your line
Four questions settle most cases of deflashing plastic bottles.
- How many bottles an hour? A few hundred a day can be done by a semi-automatic trimmer. A line making thousands needs an automatic machine.
- What happens at the rim? Induction sealing, foil liners and tight cap liners all need a flat, square, burr-free face. Plain screw caps on non-critical products are more forgiving.
- How many bottle types? A plant that changes bottles often wants a machine with quick changes of holder and cutter. A plant making one bottle in volume wants speed.
- What comes after? If the cut bottle goes straight to a leak tester, a machine that cuts and tests in one frame saves a conveyor and a station.
The cut quality that matters is easy to define. A good cut is flat, square to the neck ring, free of burrs and clean of loose plastic. Check it by running a finger around the rim, looking along it against light, and fitting a cap and liner. A cut that fails any of these tests needs the cutter, the holder or the speed adjusted.
The article on setting up a neck cutting machine for HDPE and PP containers covers the adjustments. The article on when blow moulded bottles need neck trimming covers whether a given bottle needs the step at all.
What to send for a recommendation
To plan deflashing plastic bottles on your own line, a sample bottle or a neck drawing is the best starting point. Send the material, the neck finish, the bottle height and diameter, and the output you need per minute. Say whether the bottle has handle webs or base flash, and whether the cut bottle goes on to a leak tester, so the line can be planned together.
LONGSN engineers reply with a model, the cutting head setup and a quotation. Use the contact page to send the details, or open the neck cutting machine category to see all six models with photos and specifications.
Frequently asked questions
What is flash on a blow moulded bottle?
Flash is the extra plastic squeezed out where the two mould halves close on the parison. On an extrusion blown bottle it forms a dome above the neck, a tail below the base and a thin seam along the parting line. All of it has to be cut away.
What is the fastest way of deflashing plastic bottles?
An automatic neck cutting machine in line with the blow moulder. The LONGSN neck cutting models list 10 to 30 containers per minute. Output depends on the bottle size and the number of cutting heads.
Can cryogenic deflashing be used on jerry cans?
It is mainly used on small moulded parts with thin flash. A jerry can has a thick neck dome and a large body, so tumbling or blasting is a poor fit. A neck cutting machine also leaves a flat sealing rim, which tumbling cannot do.
Does a neck cutting machine remove flash from the base of the bottle?
The neck cutting pages on this site describe cutting the dome above the neck ring. They do not describe base trimming. If your bottle has a tail at the base, ask what the machine can do before ordering.
Do I need to change my mould to fit a deflashing machine?
The LONGSN pages describe machines made to the customer's bottle, with diameter and height set to order, and none mentions a mould change. Confirm with a sample and the neck drawing so the holder and cutting head can be matched.
What should I send to get a deflashing machine quotation?
Send a bottle sample or drawing, the material, the neck finish, the bottle height and diameter, and the output you need per minute. Say whether the cut bottle goes on to a leak tester so the line can be planned together.